Saturday, December 3, 2011

Have yourself a furry little Christmas!

Christmas is fast approaching and with it comes the season of giving. So why not place a homemade gift under the tree this year? This list has something for everyone! So grab some thread an fabric- Christmas is only 21 days away!
For Siblings
This Christmas give the gift of warmth and fuzzy feelings with a bomber hat. Relatively easy to sew, I have listed URL's for 3 different variations of the hat. Try making one with a buffalo plaid and faux fur for a rustic look, try a quilted nylon for a modern twist on an old favorite!
Free patterns and even tutorials are listed for each! So what are you waiting for? Get sewing! :)
http://www.threadbanger.com/post/15378/bomber-hat-pattern
http://www.shelby.fi/kaava/403/403.php
http://www.craftster.org/forum/index.php?topic=87662.0;all

http://www.craftster.org/forum/index.php?topic=87662.0;all

For Mom/Grammy (what? You expect me to say Grandma? I'm not 16 yet, people)
Give the gift of fashionable footwear with slippers you may never want to take off! Try making them in cute holiday (reindeers, snowmen, santas etc) print with a fleece lining for the
perfect holiday token!For a style that lasts all year round, try creating these in a timeless
prints such as plaid,check, dot etc, or just make it solid!
http://jojoebi.blogspot.com/2009/11/cosy-slippers-tutorial.html
http://www.craftstylish.com/item/40023/how-to-make-monogrammed-fleece-slippers
http://blog.craftzine.com/archive/2010/01/velvet_slippers_sewing_pattern.html

http://jojoebi.blogspot.com/2009/11/cosy-slippers-tutorial.html


For Dad/Grandpa
Give what every good Dad wants season with an assortment of cases, covers, and sleeves for every guy's favorite technology. Try out these easy tutorials to give the gift of style an protection this season for your favorite techie!
iPod Cozy: http://julieree.blogspot.com/2006/11/ipod-cozy-tutorial.html
CD Covers: http://mushroomvillagers.wordpress.com/cd-poket-tutorial/
Camera Case: http://www.evilmadscientist.com/article.php/camerabag
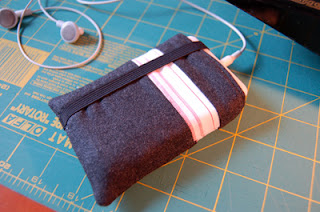
http://julieree.blogspot.com/2006/11/ipod-cozy-tutorial.html


For the Best Friend
Check out this tutorial to make your bestie her very own lunch bag! Say bye bye to brown bags as you give this Eco friendly lunch tote. Make yours out of your BFF's favorite colors and patterns! The tote is made of Oil cloth and lined with vinyl. Your friends will love having their own fabulously fashionable lunch!
http://tumblingblocks.net/blog/index.cfm/2007/7/31/oilcloth-lunch-bag
http://jumillastories.blogspot.com/2007/03/since-you-asked.html
http://supamb.com/supafine/2007/10/06/how-to-lunch-bag-based-on-plastic-grocery-sack/

http://tumblingblocks.net/blog/index.cfm/2007/7/31/oilcloth-lunch-bag

So what are you waiting for? Spin to the fabric store, while the ideas are fresh in your mind! Try each URL for variations on the same ideas and projects. Happy sewing!
~Lilly Ferron :)

Friday, December 2, 2011

Ruff!

It's been a while since I've posted a pattern, but finally, here is one! Ever wish you  could have that super plush jacket or slipper on your head? Well now you can, with thredHED's two in one wolf hat and scarf! This hat is super cute- perfect for any teen! The style closely mimics the UK's Spirit Hoods hats, but I'm sure will cost only a fraction of the price! This project uses approximatley .8 of a yard faux fur. Try it in a mottled gray for a true woodsy look, or a dark grayish black for a husky feel. I don't know about you, but I will definatley be making me one of these soon! Here's the link: http://www.burdastyle.com/patterns/wolf-hat
This next illustration is by burdastyle member thredHED
Thanks for reading,
Lilly Ferron :)

Thursday, December 1, 2011

Denim Shortalls: Part Two

     The leaves are turning and the world around us is turning into a mix of yellow, orange and, in some places green! But not my sewing table- which is turning into an explosion of denim threads! This week, we will be learning how to finish the bodice and sew the shorts.
      As I was sewing this, I realized that my pattern for the shorts would not fit the (pardon my crude language) "butt" of my doll. To fix this little giggle,  Please adjust the top of your shorts pattern to 4.25 inches. This will insure a perfect fit!1
     Step 1
In this step, we will be attaching the waistband pieces to the bodice. I reccomend sewing the 2 waistband pieces together first, and then pinning the fabrics so that the seams match. Once you have pinned the segments, sewin a straight line all the way around, stopping when you reach the farthest reaches, as we must leave a place for our fastening (velcro).
The end result should look like this:

Step 2:
Next, we will begin to construct the shorts. Take one of your newly refurbished back pieces, and an opposite facing piece. Sew the long side seam (the side without the crotch piece).
 Step 3: Next, sew the one of the legs to the other at the crotch. This will be your front piece. For now, we will leave the back crotch seam open so we can insert the velcro. Once you have completed this, sew up both piece at the short straight seam opposite the long one. Sorry for my poor directions! If you have ever made 4 piece shorts, dig out the directions- McCall's can probably explain better than I can!
Sewing the short seam :)
Attachting the two pairs together!

The "U" Shaped Crotch Seam- hard while leaving room for velcro!
And wa-lah! You are done with your shorts! Tune in next week when we will insert the velcro and attach the shorts to the waistband, finishing our garment! Thanks for reading!
~Lilly Ferron

Sunday, November 13, 2011

Fortie's Fashion: Denim Shortalls Pattern and Tutorial Part 1

Isn't fashion beautiful? To start off Teen Sew's newest segment, forties fashion, we are introduced to the new doll pattern for a revolutionary piece: The romper, or, as called in the forties, the "shortall" a cross between shorts and over-alls. Want to check out what the end result will be? Check out this catalouge scan from Sear's and Roebuck, 1942.

Here's the pattern: Just Click to Enlarge and the click file, and print, to cut out the pieces for your doll. To avoid confusion, a 3/8 seam allowance is included on all pattern pieces.
Now on to materials! For this project, you will need denim thread and fabric, velcro, and bias binding trim. The pattern calls for "Surf Blue Denim". I am using a light weight fabric, so that I will not have to change needles for this project. Plan on using 1/4 to 1/2 a yard of fabric. I used standard denim thread by Coats and Clarks. It blends in easily with the fabric, which is ideal for the end result. If you want to be daring, however, you can use a contrast color or the classic gold used for jeans and jackets. Unless you want to deal with itsy bitsy buttons and teeny weeny zippers, I would suggest using velcro fastening. You can choose the sew on kind, for a cleaner finish, but I took the easy route and decided to use sticky back.


Now let's start sewing!

For the first step, take your two bodice pieces, and place them front side together. Sew a seam up the edge. like the photo shows below.

After this, we will attach the bias binding tape to the top of the bodice. You can either use the store bought kind, or you can cut an 1 inch strip on the bias of your fabric. To attach the small strip of fabric, place the blue part of the bias binding tape (or the front of the dennim) so that it is touching the front of the bodice. Sew the piece of fabric on, using a 3/8  in seam. After you do that, fold the tape over to the back of the denim so that the blue, finished part shows on the garment. Sew the tape to the back of the denim, folding the seam into the tape. This seam will show, so sew carefully. Do this twice for each side of the bodice.  Use the pictures below for a visual aide.

Sew the bias binding tape on like this, making sure to include a little extra for seam allowance.


Fold the tape over like this to make a neat finish.


The end result should look like this :)

Now that you've finished the front of the bodice, move on to the back. Take two of the triangles and sew the curved sides together. Leave the straight sides open to add into other seams. Next, sew the traingles onto the side of the bodice.
Great job! You've finished the bodice! Tune in next week for the rest of the tutorial, when we finish your doll's new vintage denim short-alls!
What 40's fashion do you want to see featured next? Questions, Comments? If there is anything you don't understand or need me to clarify, please either email me at teensew@gmail.com or write it in the comment box below.
Thanks for reading, Lilly Ferron :)

Saturday, November 12, 2011

I'm Back! (And other sewing stuff)

First off, let me say that I am horrible with up-keep. But, I will now be posting weekly, with tutorials (yay!) I'm taking the liberty of introducing a new segment today as well: Forties Fashion. I know it sounds cheesy, but I've been doing a little bit of research, and it's actually quite interesting! Each week, I will be posting a tutorial, as well as a pattern to fit an 18 inch doll. Don't worry, though- I'll include a conversion table so you can enlarge the patterns to fit a real person :) So grab your favorite vintage fabric, and get sewing!

Tutorials will be posted each Sunday, so check back often for more updates!

Saturday, October 1, 2011

Everlasting Eyeliner: How to put on eyeliner for every occasion!

Let me just say, with cousins such as Estella, Celeste, Samantha, and Mellissa, things are definatley never dull! This quick and easy tutorial teaches you how to put eyeliner on the right way- and it even includes two different looks to try out! Try out these simple tips and you'll be sure to see a difference! In this tutorial, Celeste and Estella will experiment with two different looks: Party and Casual. So go ahead, try them out!
Thanks for watching! Be sure to keep your eyes out for some new tutorials, done by Estella and Celeste. Got any ideas for some note worthy makeup tutorials? Share them in the comment box below!

Cute Down Do' Video Tutorial

I don't know about you, but I find myself always thinking back on that one special day of the year, wishing for it to come again. For you, it may be an awesome birthday sleepover, a special outing to a baseball game, christmas, whatever! But for me, it has most definatley got to be the Ferron Family Reunion. This is the time were I get to get together with all my cousins for a hilarious time! When my cousins Celeste and Estella heard about my blog, they knew that they wanted a post! Both are aspiring hair stylists, and are insanley good at their trade! This video tutorial is a quick, easy, step by step guide to making a cute down do'- something you can wear practically anywhere- be it school, a special date, or a super cool party! So what are you waiting for? Check it out! (If only for the hilarious blooper moments at the end!) :)


Thanks so much to Celeste and Estella! Needless to say, I can't wait for our next family reunion. And who knows? Maybe after this Celeste and Estella will agree to lend their expertise to even more tutorials!

Please comment if you would like more makeup, hair and tutorials on TeenSew, your one stop shop for everything creative and fashionable!
Like Love Celeste's and Estella's tutorials? Say so in the comment box below :)
Happy Hairstyling,
Lilly Ferron

Tuesday, September 27, 2011

Twists and Turns: The Twister Top Pattern by "apfelbluete"

I don't know what it is about this pattern- but sewing it is strangley addicting. First of all, it only takes an hour. Second of all, the end result is awesome looking! The tight arm, and the opposing batwing one looks so cool- it's kind of a optical illusion but made with a needle and thread! Try altering this mini into a top, pair with aviators and jean shorts, and top it all off with a slouchy beret for a look that's totally unique!
Click here for the pattern! As usual, check out these member project to help you decide whether this look is for you!

By irmchen

By Philomenia
By apfelbluete

vivelyonline
Happy Sewing!
Lilly :)

Monday, September 26, 2011

Style File

To me, sewing is a way of expressing myself. In the same way some can let creativity flow through a paint brush, or others through song, my creativeity flows through a machine- a beautiful, clothes making machine.
Okay, come on, even I know that sounded lame. Usually when people make their own clothes, this awesome gift also comes with a pretty sharp sense of style. Many of my readers have requested a forum to showcase their own personal style- whether through sewing or just pieces you've collected here and there! Starting next week, I will be accepting submissions to the new STYLE FILE Page. So put together your best outfit, and send it to me to post! And who knows? Maybe a prize or two will be included! To enter, please email all submissions to teensew@gmail.com and fill out this form. (Don't worry, it doesn't take long!
1. Name of My Oufit or Ensemble
2. Where you got it, if thrifted etc (nullify if sewn)
3. Your blog or personal website
4. A short description of your outfit or ensemble (ie, This outfit consists of a thrifted handbag in perriwinkle blue, paired with my favorite American Eagle Skinny jeans and a plaid button down)

Thanks for entering!
If you plan on entering, please leave a comment below. I'll need ideas for future giveaways and prizes as well!
Lilly :)

Friday, September 23, 2011

Burn Notice and New Patterns

Blogging wise, I have gotten quite side-tracked. I blame it on my obsessive watching of my favorite show, Burn Notice, but I know that that's not the case. But it's pretty much irresistable- I love spies shows! Plus, they film in Miami, a place I have always wanted to visit. Blue, Blue water, Golden Beaches, what's not to love!?
Anywho, this fall season is all about slim sillohuetes and colors like black and gray. This skirt can be just that! The Kasia skirt is a super-cute pencil skirt with decorative buttons and contrast (well, it doesn't have to be :D) pockets. Try it in a sensible ash gray wool and line the pockets with a slick black cotton and cloth buttons for a look that's perfect for the work place or just strolling around town! Check out these member projects:


Happy Sewing!
Lilly :)

Tuesday, September 20, 2011

Birthdays and Feathers!

So yah, I was a little late to the feather train. Personally, I think that this new fad really has something going- It actually looks really cool! My birthday was last week, and for it I was allowed a feather! But as we went around to various salons, I found that the picking was slim. But then I found it- the perfect feather! It's a powder blue, with those little grizzly stripes that I've come to love! My hairdresser also put in "tinsel." It is what it says it is: Sparkly pieces of tinsel for your hair! I aso got aviator sunglasses, which I sooo heart. So here's to happy birthdays, huh?
I <3 these aviators!

It's on the left side of my horrible fishy face- lol!

Peace Love Feathers!

Friday, September 16, 2011

Vest Project and Tutorial

Let me just say, first off, that mosquitoes in the south are horrible. I've been meaning to do this shoot for a while; after all, I did finish the project on Sunday. But things came in the way- I got sick, I had school, etc, etc. So, when Friday finally rolled around, I decided to give it ago! However, in the process, I managed to get eaten alive by those darn skeeters. My ankles are currently the size of grapefruits. Anywho, onto the project!
I recently found a lovely tutorial, posted by "Nay" of Sweet Lemonayde, a teen sewing blog just like mine! I thought her idea was cool, and decided to make my own. I made some alterations to the design, like adding a band to the bottom to give it more shape. Over all, I'm actually pretty pleased with the result! I used navy blue sweathshirting fabric, and overlocked the seams. I bound the armholes and pockets with bias binding tape, also in navy. Also, I know I look kind of weird in the pictures. It's hard to keep a normal expression when you can see a little black vampirette on your leg.
The blue and navy shirt that I am wearing under the vest is an Aeropostale V-Neck. I am wearing American Eagle Cropped Skinny jeans, and Route 66 Shoes :)
To access Nay's tutorial, click here!

I loved the wildnerness background we used for the shoot!


This was my first time doing an exposed zipper, and it turned out quite well!

Sorry about my weird expression. That's me wondering: How much longer do I have to stand here getting bit to death?


I love the way the band turned  out! This vest is definatley my new fall/winter staple!

Crossing the creek! Again, I am not very photogenic haha :)

Happy Sewing,
Lilly! :D

Thursday, September 15, 2011

Talea Coat

Autumn is a knocking on our door steps and chilly days will soon be ahead! So what better than to sew yourself up a cute winter coat? I love this pattern with its purposeful pockets and military style epaulets. But this style is versatile- make it a khaki ripstop for that classic grunge look or a playful plaid for a look that's totally modern! This delightful pattern was drafted by Burdastyle, and as usual is free! Here are some pictures of the completed projects-
I absoutley love junespoon's rendition of this jacket! The buttons and military style detailing make it the perfect pick for a cold winter day!

This plaid Talea is my idea of a cozy fall day- I absolutley love the fabric!
Yay! Photo Shoot Tommorow! I just finished up sewing my "hooded vest." It turned out soooo cute!
Happy Sewing,
Lily :)

Saturday, September 3, 2011

Crop Top Photo Shoot

For this epic shoot, my sister, dad, and I hit the beach! We came in the evening, so the sun was just setting as we took the pictures. Notice the cute color blocked details on this crop top! To download the pattern, click here. And, as customary, here are the pictures!


<3 You Hannah!

TeenSew Summer 2011


These cute and sensible pattern pair works well with any figure or fabric! Pair this flutter sleeve cardi and vintage bias trimmed mini dress with a broad leather belt around the waist to add a subtle sillohuette.
Here's some pictures of the finished products :)

by parze
by tricksy
by mikabak
Happy Sewing!
Lilly :)
Related Posts Plugin for WordPress, Blogger...