Tuesday, January 21, 2014
Friday, August 16, 2013
Shoes, Sewing, and the lack thereof


Friday, November 23, 2012
Let It Snow! Blanket Tutorial
Now that Thanksgiving is over, there's only one logical thing to do: Think about Christmas. I've pretty much been on sewing withdrawal these last few months, itching to do a project, but never having enough time to do much of anything. Yah, yah, I know- what could a 15 year old be doing that takes up every waking hour? You'd be surprised.
But enough of my boring life. Let's get onto the sewing!
You know how I asked what is taking up so much of my precious sewing time? Well, I'll give you an answer- marching band. Not to brag or anything, but we're the state champions right here in sunny old Florida. But being champions doesn't come easy- we usually practice about 4 days a week, 5 hours a day. Don't get me wrong, I love marching to death. It can just sometimes get a bit tedious.
So anywho, in band, we have these people that are supposed to be our "big sisters". Basically they are an older band member who helps a younger, much less experienced member (such as myself) get through the season. Now that marching band season is over though, I started to think what I should do to sort of pay my older sister back for all the help she gave me this season. Trust me- without her, I would suck. And I'm not even that good now, so you get the idea. Anywho, it took me a while to think of the idea, but finally it hit me: a blanket. During the marching season, we take many long late night bus trips to and from competitions, and a blanket is just what she would need.
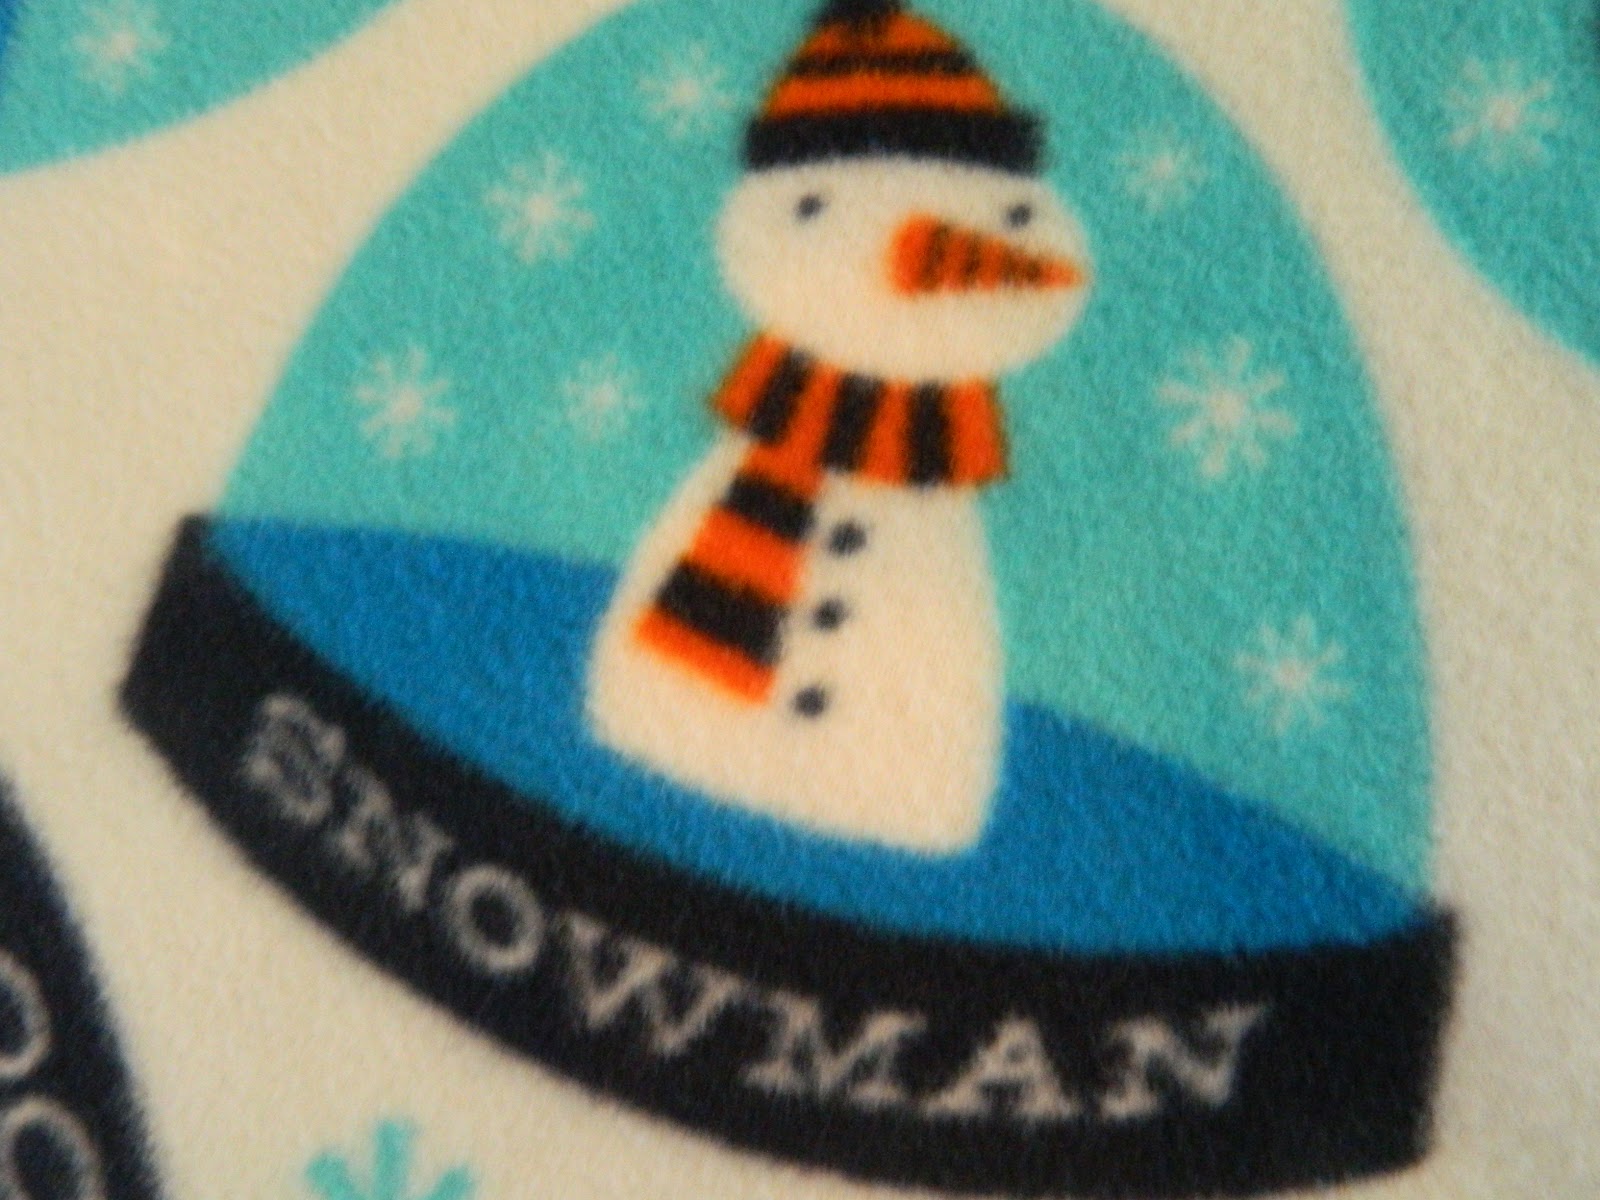
All it took was a quick trip to Joann's and about an hour of sewing, which is just the way I like it. This is the fabric I picked. Isn't it just adorable?
 Great lighting, I know. Don't worry, complimenting isn't necessary :). Anywho, all I did was use a simple "blanket" stitch (a fairly common stitch that can be found on most modern machines) to sew off the raw edges. I did that to every edge, so it looked like this.


But enough of my boring life. Let's get onto the sewing!
You know how I asked what is taking up so much of my precious sewing time? Well, I'll give you an answer- marching band. Not to brag or anything, but we're the state champions right here in sunny old Florida. But being champions doesn't come easy- we usually practice about 4 days a week, 5 hours a day. Don't get me wrong, I love marching to death. It can just sometimes get a bit tedious.
So anywho, in band, we have these people that are supposed to be our "big sisters". Basically they are an older band member who helps a younger, much less experienced member (such as myself) get through the season. Now that marching band season is over though, I started to think what I should do to sort of pay my older sister back for all the help she gave me this season. Trust me- without her, I would suck. And I'm not even that good now, so you get the idea. Anywho, it took me a while to think of the idea, but finally it hit me: a blanket. During the marching season, we take many long late night bus trips to and from competitions, and a blanket is just what she would need.
All it took was a quick trip to Joann's and about an hour of sewing, which is just the way I like it. This is the fabric I picked. Isn't it just adorable?


Cute, right?
Now I know all of my blahing on and on isn't exactly informative, so I formatted the information in tutorial form, as you can see below.
Let it Snow Blanket Tutorial
Materials:
2 yards of 58 " fleece
Sewing Machine (duh)
Thread (also duh)
Instructions:
1. Sew a side of the blanket, very near the edge. The stitch must pick up the edge of the fabric, so I recommend trying a test swatch first in order to make sure you get the right idea.
2. Sew 3 other sides, clipping the end threads as you go.
3. As you can see, making blankets isn't hard. In fact, you probably knew that from the get go. But I'm just nice and decided to lay out some murky instructions for ya :)
More pics of my beautiful blanket are below. Aren't they great quality? Yah, I'll be back to using tripods for my next post, don't worry.


Happy Sewing!
Love, Lilly :D
Tuesday, May 29, 2012
Cue the Beach Boys: Coverups
It might just be me, but I think it's kind of awkward to just walk around in a bikini, when you aren't in the water or sprawled on the sand. My favorite is the ol' tshirt and shorts combo- but this spring I decided to get creative and from my own pattern, make a romper. Needless to say, it didn't work out so well, as I haven't posted anything on it. It was basically due to my ditziness; I sewed the wrong pieces together. So I don't know if I may continue, but if I don't, here's a few of my other pics.
Romper: This style is my ideal beach cover up- it's so easy to slip on and off for impromptu dips after a bit of tanning (not that I tan, us redheads BURN).
My favorite pattern has probably been already posted, but I'll post it again!
LINK: Click here to access the free pattern!
This particular pattern as cute details that make this cover up stellar- such as the subtle ruching on the bodice! Check out some past projects made with this pattern!
 Sorry it's so tiny! The full picture included the maker's head, and I didn't want to violate privacy. Don't worry, you can find it on the sewer's BurdaStyle page: Heleen de Haan.
Romper #2: This pattern is slightly classier, with belt loops and a V Neck, but it is still perfectly awesome for the beach. My advice? Buy a cute Hawiann Floral for a perfect swimsuit match!
Link: Access this free pattern here!
Some Finished Products:


Romper: This style is my ideal beach cover up- it's so easy to slip on and off for impromptu dips after a bit of tanning (not that I tan, us redheads BURN).
My favorite pattern has probably been already posted, but I'll post it again!
LINK: Click here to access the free pattern!
This particular pattern as cute details that make this cover up stellar- such as the subtle ruching on the bodice! Check out some past projects made with this pattern!
Romper #2: This pattern is slightly classier, with belt loops and a V Neck, but it is still perfectly awesome for the beach. My advice? Buy a cute Hawiann Floral for a perfect swimsuit match!
Link: Access this free pattern here!
Some Finished Products:

But Romping aside, there's plenty of other ways to cover yourself up. Take sarongs, for example. Though slightly tinier then my past two options, they are a great way to go from the beach to your next destination!
Sarong #1: This sarong is more of a dress option- basically just a rectangle that you can tie- but that leaves lots of room for variation in length! Try making one in a cute print!
Link: To access the tutorial, click here.


Sarong B: This is the skirt variation, with a tutorial from a different site.
Link: To access the tutorial, click here.
What the end result looks like:

Sorry that this isn't the best post ever- but it still has lots of good information and places to find great sewing patterns without spending a dime.
So Happy Sewing!
Lilly :)
Monday, May 28, 2012
Cue the Beach Boys: Beach Bag Edition
With only a week or so of school left, I bet you already probably know what's on my Floridian mind: The beach. After a fruitless spring of sewing, I've decided that during this vacation, nothing's gonna stop me from creating the stuff of my dreams. This post is a compiliation of all the components for a day of fun in the sun, along with tutorials and fabric suggestions. Have fun!
I bet that most all of you have a trusty beach bag (probably not just one) tucked away in some corner of your house. But if mine's anything like yours, its drab. After all, just because there's a little sand involved doesn't mean that we have to throw style to the wind, right? Here's a few patterns that caught my eye when looking for this essential piece.
Refresh With Mesh: This Beach Bag is made mostly with mesh and just a bit of grosgrain ribbon- cute and functional!
The End Result:


Upcycled Towel Bag: This project is great for achieving a patchwork look and it uses up scraps of towels, too. If you don't want to part with any of yours, just go to a dollar store- they will have cheap finds there that will serve the purpose quite nicely!
The End Result:
 My Picks: If you don't want to use scraps from an array of towels, try just making it out of one- you can either use the squares and follow the tutorial, or you can cut off two two inch strips from the short ends of the towel and then sew up the long sides. Try using a zebra print towel and neon green straps for a "totally teenage" (that term was "crazily cheesy") look.
Find the Instructions Here: http://alisaburke.blogspot.com/2010/05/beach-towel-tote-tutorial.html
Stay tuned over the next few weeks as I reveal cute patterns/ tutorials for SWIMSUITS, sunhats, COVERUPS, and more!
Happy Sewing,
Lilly!
I bet that most all of you have a trusty beach bag (probably not just one) tucked away in some corner of your house. But if mine's anything like yours, its drab. After all, just because there's a little sand involved doesn't mean that we have to throw style to the wind, right? Here's a few patterns that caught my eye when looking for this essential piece.
Refresh With Mesh: This Beach Bag is made mostly with mesh and just a bit of grosgrain ribbon- cute and functional!
The End Result:
My picks: Try using an ocean blue toned mesh with tangerine ribbon for a fun summer look!

Find the Instructions at this URL: http://www.marthastewart.com/273704/mesh-bag
The End Result:

Find the Instructions Here: http://alisaburke.blogspot.com/2010/05/beach-towel-tote-tutorial.html
Stay tuned over the next few weeks as I reveal cute patterns/ tutorials for SWIMSUITS, sunhats, COVERUPS, and more!
Happy Sewing,
Lilly!
Sunday, March 11, 2012
Patterns Perusal
I haven't been on Burdastyle much lately, which has really been bothering me. So today I decided to see what was new. Turns out, there's a bunch! But I just picked a few favorites for my post.
First, I have this boxy top pattern. This simple style is perfect in an array of knits and is loose enough to provide a classic shape. Not only can this pattern be made into adorable dresses, but it can also be used as a basic sloper for your future alterations or patterns from scratch.
Try this: Try setting the hem a little higher for a perfect spring crop top!
URL: http://www.burdastyle.com/patterns/short-wide-top


But doesn't it have loads of potential?
Happy Sewing, Lilly :)
First, I have this boxy top pattern. This simple style is perfect in an array of knits and is loose enough to provide a classic shape. Not only can this pattern be made into adorable dresses, but it can also be used as a basic sloper for your future alterations or patterns from scratch.
Try this: Try setting the hem a little higher for a perfect spring crop top!
URL: http://www.burdastyle.com/patterns/short-wide-top

Isn't this cute? This top, and the pattern, is made by Burdastyle member Janav.

I am "sew" in love (that was 'sew' cheesy, I know) with this outfit and the whole look in general! I might have to try this!
Wouldn't it look cute in a bright lime knit with a hot pink belt? Ooo! or maybe tangerine and aqua!
This look was created by mandicoulter
On a different note, spring also brings an array of dances and formals! My own school is holding a masquerade, and though I didn't pick up tickets, I do have my eyes set on the eighth grade graduation dance. I'm thinking of something casual yet dressy. An oxymoron, huh?
Anywho, this is the Sonja pattern by Burdastyle member ElisaSalme.
Unfortunatley, I don't have much pics except this technical one posted by Elisa (sorry!).
Happy Sewing, Lilly :)
Monday, January 9, 2012
Yoga Pants and Other Sporty Things
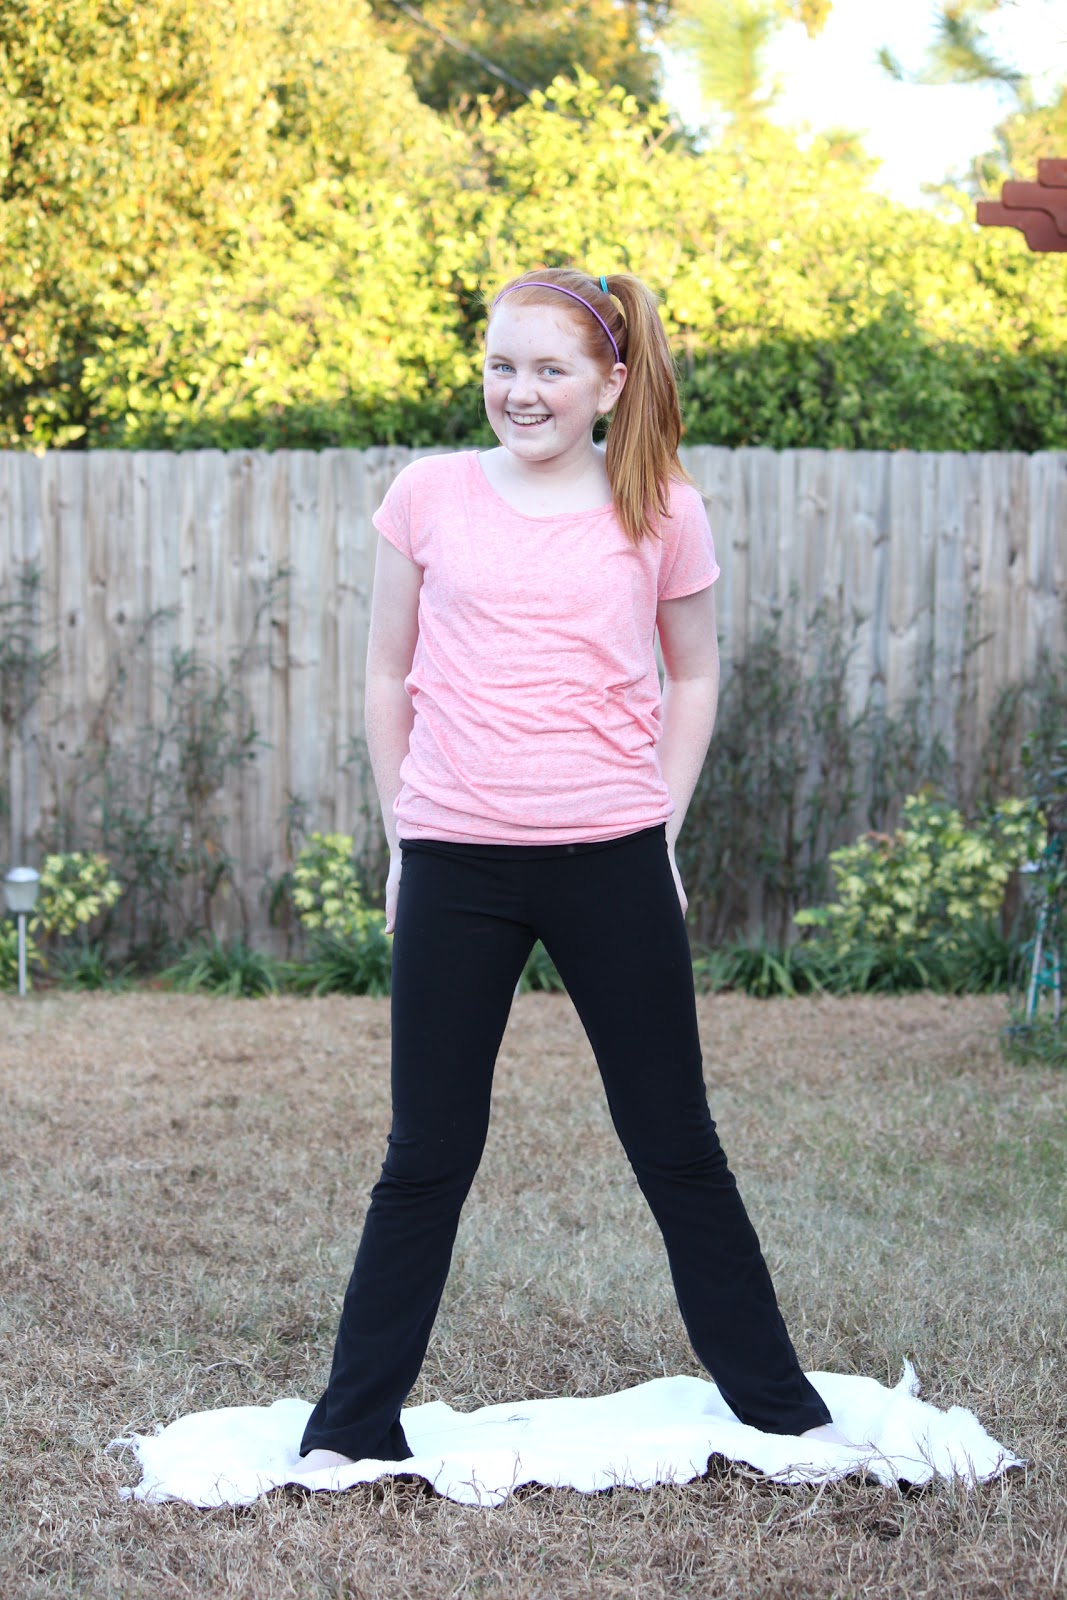
Any short readers out there? If so, you know what it's like to find a perfectly good pair of pants and then watch in frustration as the end lays in puddles on your feet! That's what gave me the idea for these uber cute yoga pants!
Whether at class or just lounging around in the house (and doing other sporty things haha) I'll be in style! Here's the shoot, done with my Dad's new D-SLR camera. See the difference?
If you like, you may skip down the page to see the tutorial on how to make some just like mine!


Whether at class or just lounging around in the house (and doing other sporty things haha) I'll be in style! Here's the shoot, done with my Dad's new D-SLR camera. See the difference?
If you like, you may skip down the page to see the tutorial on how to make some just like mine!


To Make Your Perfect Pair:
Grab a pair of good fitting pants or a 2 piece leggings pattern. Don't worry; we will alter it later.
For this project. you will need about a yard to a yard and a quarter (depending on your size) to make these.
To alter your leggings pattern, measure your inseam length (or were you want the pants to fall), the length of your thigh at the highest point before your crotch, mid-thigh, and knee. Make sure the leggings pattern corresponds to this. Next, make a V out to the edge of your pattern, starting at the knee. For a Size XS (Juniors 0) make the bottom of the V (the leg opening) 18 inches long. For an S (Juniors 2) make the V 20 inches, etc. Add one inch to hem and then sew according to your pattern!
Wah-lah! New Yoga Pants
What do you think?
Sew, Sew, Sew,
Lilly Ferron :)
Sunday, January 8, 2012
Sewing in the new year! (January Week 2 Pattern Post)
My New Year's Resolutions:
1. Sew
2. Update Blog
3. Sew
4.Update Blog
5. Etc. :)
Well, after getting a new laptop for christmas, I am back on the world wide web. Yesterday, in a flurry of crafting, I made myself some yoga pants- they fit perfectly! As for now, however, how about getting a couple of new garments sewn to welcome in the new year? I don't know about you, but spring means dances. Proms, Graduation, Spring Flings.(Okay, fine, we don't have proms in junior high and they don't exactly call our spring socials "flings") My mind is bubbling with ideas to sew and wear! This pattern is not on the topic of dances, however- but it's cute none the less!
 |
| This pattern free blouse by RunwaySewing can be found at http://www.burdastyle.com/projects/pattern-free-blouse-3/instructions/1 |
Saturday, December 3, 2011
Have yourself a furry little Christmas!
Christmas is fast approaching and with it comes the season of giving. So why not place a homemade gift under the tree this year? This list has something for everyone! So grab some thread an fabric- Christmas is only 21 days away!
For Siblings
This Christmas give the gift of warmth and fuzzy feelings with a bomber hat. Relatively easy to sew, I have listed URL's for 3 different variations of the hat. Try making one with a buffalo plaid and faux fur for a rustic look, try a quilted nylon for a modern twist on an old favorite!
Free patterns and even tutorials are listed for each! So what are you waiting for? Get sewing! :)
http://www.threadbanger.com/post/15378/bomber-hat-pattern
http://www.shelby.fi/kaava/403/403.php
http://www.craftster.org/forum/index.php?topic=87662.0;all
For Mom/Grammy (what? You expect me to say Grandma? I'm not 16 yet, people)
Give the gift of fashionable footwear with slippers you may never want to take off! Try making them in cute holiday (reindeers, snowmen, santas etc) print with a fleece lining for the
perfect holiday token!For a style that lasts all year round, try creating these in a timeless
prints such as plaid,check, dot etc, or just make it solid!
http://jojoebi.blogspot.com/2009/11/cosy-slippers-tutorial.html
http://www.craftstylish.com/item/40023/how-to-make-monogrammed-fleece-slippers
http://blog.craftzine.com/archive/2010/01/velvet_slippers_sewing_pattern.html
For Dad/Grandpa
Give what every good Dad wants season with an assortment of cases, covers, and sleeves for every guy's favorite technology. Try out these easy tutorials to give the gift of style an protection this season for your favorite techie!
iPod Cozy: http://julieree.blogspot.com/2006/11/ipod-cozy-tutorial.html
CD Covers: http://mushroomvillagers.wordpress.com/cd-poket-tutorial/
Camera Case: http://www.evilmadscientist.com/article.php/camerabag
For the Best Friend
Check out this tutorial to make your bestie her very own lunch bag! Say bye bye to brown bags as you give this Eco friendly lunch tote. Make yours out of your BFF's favorite colors and patterns! The tote is made of Oil cloth and lined with vinyl. Your friends will love having their own fabulously fashionable lunch!
http://tumblingblocks.net/blog/index.cfm/2007/7/31/oilcloth-lunch-bag
http://jumillastories.blogspot.com/2007/03/since-you-asked.html
http://supamb.com/supafine/2007/10/06/how-to-lunch-bag-based-on-plastic-grocery-sack/
So what are you waiting for? Spin to the fabric store, while the ideas are fresh in your mind! Try each URL for variations on the same ideas and projects. Happy sewing!
~Lilly Ferron :)
For Siblings
This Christmas give the gift of warmth and fuzzy feelings with a bomber hat. Relatively easy to sew, I have listed URL's for 3 different variations of the hat. Try making one with a buffalo plaid and faux fur for a rustic look, try a quilted nylon for a modern twist on an old favorite!
Free patterns and even tutorials are listed for each! So what are you waiting for? Get sewing! :)
http://www.threadbanger.com/post/15378/bomber-hat-pattern
http://www.shelby.fi/kaava/403/403.php
http://www.craftster.org/forum/index.php?topic=87662.0;all
 |
| http://www.craftster.org/forum/index.php?topic=87662.0;all |
For Mom/Grammy (what? You expect me to say Grandma? I'm not 16 yet, people)
Give the gift of fashionable footwear with slippers you may never want to take off! Try making them in cute holiday (reindeers, snowmen, santas etc) print with a fleece lining for the
perfect holiday token!For a style that lasts all year round, try creating these in a timeless
prints such as plaid,check, dot etc, or just make it solid!
http://jojoebi.blogspot.com/2009/11/cosy-slippers-tutorial.html
http://www.craftstylish.com/item/40023/how-to-make-monogrammed-fleece-slippers
http://blog.craftzine.com/archive/2010/01/velvet_slippers_sewing_pattern.html
 |
| http://jojoebi.blogspot.com/2009/11/cosy-slippers-tutorial.html |
For Dad/Grandpa
Give what every good Dad wants season with an assortment of cases, covers, and sleeves for every guy's favorite technology. Try out these easy tutorials to give the gift of style an protection this season for your favorite techie!
iPod Cozy: http://julieree.blogspot.com/2006/11/ipod-cozy-tutorial.html
CD Covers: http://mushroomvillagers.wordpress.com/cd-poket-tutorial/
Camera Case: http://www.evilmadscientist.com/article.php/camerabag
 |
| http://julieree.blogspot.com/2006/11/ipod-cozy-tutorial.html |
For the Best Friend
Check out this tutorial to make your bestie her very own lunch bag! Say bye bye to brown bags as you give this Eco friendly lunch tote. Make yours out of your BFF's favorite colors and patterns! The tote is made of Oil cloth and lined with vinyl. Your friends will love having their own fabulously fashionable lunch!
http://tumblingblocks.net/blog/index.cfm/2007/7/31/oilcloth-lunch-bag
http://jumillastories.blogspot.com/2007/03/since-you-asked.html
http://supamb.com/supafine/2007/10/06/how-to-lunch-bag-based-on-plastic-grocery-sack/
 |
| http://tumblingblocks.net/blog/index.cfm/2007/7/31/oilcloth-lunch-bag |
~Lilly Ferron :)
Friday, December 2, 2011
Ruff!
It's been a while since I've posted a pattern, but finally, here is one! Ever wish you could have that super plush jacket or slipper on your head? Well now you can, with thredHED's two in one wolf hat and scarf! This hat is super cute- perfect for any teen! The style closely mimics the UK's Spirit Hoods hats, but I'm sure will cost only a fraction of the price! This project uses approximatley .8 of a yard faux fur. Try it in a mottled gray for a true woodsy look, or a dark grayish black for a husky feel. I don't know about you, but I will definatley be making me one of these soon! Here's the link: http://www.burdastyle.com/patterns/wolf-hat

 Thanks for reading,
Lilly Ferron :)
This next illustration is by burdastyle member thredHED
Lilly Ferron :)
Thursday, December 1, 2011
Denim Shortalls: Part Two
The leaves are turning and the world around us is turning into a mix of yellow, orange and, in some places green! But not my sewing table- which is turning into an explosion of denim threads! This week, we will be learning how to finish the bodice and sew the shorts.
As I was sewing this, I realized that my pattern for the shorts would not fit the (pardon my crude language) "butt" of my doll. To fix this little giggle, Please adjust the top of your shorts pattern to 4.25 inches. This will insure a perfect fit!1
Step 1
In this step, we will be attaching the waistband pieces to the bodice. I reccomend sewing the 2 waistband pieces together first, and then pinning the fabrics so that the seams match. Once you have pinned the segments, sewin a straight line all the way around, stopping when you reach the farthest reaches, as we must leave a place for our fastening (velcro).


 Step 3: Next, sew the one of the legs to the other at the crotch. This will be your front piece. For now, we will leave the back crotch seam open so we can insert the velcro. Once you have completed this, sew up both piece at the short straight seam opposite the long one. Sorry for my poor directions! If you have ever made 4 piece shorts, dig out the directions- McCall's can probably explain better than I can!
And wa-lah! You are done with your shorts! Tune in next week when we will insert the velcro and attach the shorts to the waistband, finishing our garment! Thanks for reading!
~Lilly Ferron
As I was sewing this, I realized that my pattern for the shorts would not fit the (pardon my crude language) "butt" of my doll. To fix this little giggle, Please adjust the top of your shorts pattern to 4.25 inches. This will insure a perfect fit!1
Step 1
In this step, we will be attaching the waistband pieces to the bodice. I reccomend sewing the 2 waistband pieces together first, and then pinning the fabrics so that the seams match. Once you have pinned the segments, sewin a straight line all the way around, stopping when you reach the farthest reaches, as we must leave a place for our fastening (velcro).

The end result should look like this:

Step 2:
Next, we will begin to construct the shorts. Take one of your newly refurbished back pieces, and an opposite facing piece. Sew the long side seam (the side without the crotch piece).
 |
| Sewing the short seam :) |
 |
| Attachting the two pairs together! |
 |
| The "U" Shaped Crotch Seam- hard while leaving room for velcro! |
~Lilly Ferron
Sunday, November 13, 2011
Fortie's Fashion: Denim Shortalls Pattern and Tutorial Part 1
Isn't fashion beautiful? To start off Teen Sew's newest segment, forties fashion, we are introduced to the new doll pattern for a revolutionary piece: The romper, or, as called in the forties, the "shortall" a cross between shorts and over-alls. Want to check out what the end result will be? Check out this catalouge scan from Sear's and Roebuck, 1942.


After this, we will attach the bias binding tape to the top of the bodice. You can either use the store bought kind, or you can cut an 1 inch strip on the bias of your fabric. To attach the small strip of fabric, place the blue part of the bias binding tape (or the front of the dennim) so that it is touching the front of the bodice. Sew the piece of fabric on, using a 3/8 in seam. After you do that, fold the tape over to the back of the denim so that the blue, finished part shows on the garment. Sew the tape to the back of the denim, folding the seam into the tape. This seam will show, so sew carefully. Do this twice for each side of the bodice. Use the pictures below for a visual aide.


Here's the pattern: Just Click to Enlarge and the click file, and print, to cut out the pieces for your doll. To avoid confusion, a 3/8 seam allowance is included on all pattern pieces.

Now on to materials! For this project, you will need denim thread and fabric, velcro, and bias binding trim. The pattern calls for "Surf Blue Denim". I am using a light weight fabric, so that I will not have to change needles for this project. Plan on using 1/4 to 1/2 a yard of fabric. I used standard denim thread by Coats and Clarks. It blends in easily with the fabric, which is ideal for the end result. If you want to be daring, however, you can use a contrast color or the classic gold used for jeans and jackets. Unless you want to deal with itsy bitsy buttons and teeny weeny zippers, I would suggest using velcro fastening. You can choose the sew on kind, for a cleaner finish, but I took the easy route and decided to use sticky back.


Now let's start sewing!
For the first step, take your two bodice pieces, and place them front side together. Sew a seam up the edge. like the photo shows below.

After this, we will attach the bias binding tape to the top of the bodice. You can either use the store bought kind, or you can cut an 1 inch strip on the bias of your fabric. To attach the small strip of fabric, place the blue part of the bias binding tape (or the front of the dennim) so that it is touching the front of the bodice. Sew the piece of fabric on, using a 3/8 in seam. After you do that, fold the tape over to the back of the denim so that the blue, finished part shows on the garment. Sew the tape to the back of the denim, folding the seam into the tape. This seam will show, so sew carefully. Do this twice for each side of the bodice. Use the pictures below for a visual aide.
 |
| Sew the bias binding tape on like this, making sure to include a little extra for seam allowance. |
 |
| Fold the tape over like this to make a neat finish. |
 |
| The end result should look like this :) |
Now that you've finished the front of the bodice, move on to the back. Take two of the triangles and sew the curved sides together. Leave the straight sides open to add into other seams. Next, sew the traingles onto the side of the bodice.

Great job! You've finished the bodice! Tune in next week for the rest of the tutorial, when we finish your doll's new vintage denim short-alls!
What 40's fashion do you want to see featured next? Questions, Comments? If there is anything you don't understand or need me to clarify, please either email me at teensew@gmail.com or write it in the comment box below.
Thanks for reading, Lilly Ferron :)
Saturday, November 12, 2011
I'm Back! (And other sewing stuff)
First off, let me say that I am horrible with up-keep. But, I will now be posting weekly, with tutorials (yay!) I'm taking the liberty of introducing a new segment today as well: Forties Fashion. I know it sounds cheesy, but I've been doing a little bit of research, and it's actually quite interesting! Each week, I will be posting a tutorial, as well as a pattern to fit an 18 inch doll. Don't worry, though- I'll include a conversion table so you can enlarge the patterns to fit a real person :) So grab your favorite vintage fabric, and get sewing!
Tutorials will be posted each Sunday, so check back often for more updates!
Tutorials will be posted each Sunday, so check back often for more updates!
Saturday, October 1, 2011
Everlasting Eyeliner: How to put on eyeliner for every occasion!
Let me just say, with cousins such as Estella, Celeste, Samantha, and Mellissa, things are definatley never dull! This quick and easy tutorial teaches you how to put eyeliner on the right way- and it even includes two different looks to try out! Try out these simple tips and you'll be sure to see a difference! In this tutorial, Celeste and Estella will experiment with two different looks: Party and Casual. So go ahead, try them out!
Thanks for watching! Be sure to keep your eyes out for some new tutorials, done by Estella and Celeste. Got any ideas for some note worthy makeup tutorials? Share them in the comment box below!
Cute Down Do' Video Tutorial
I don't know about you, but I find myself always thinking back on that one special day of the year, wishing for it to come again. For you, it may be an awesome birthday sleepover, a special outing to a baseball game, christmas, whatever! But for me, it has most definatley got to be the Ferron Family Reunion. This is the time were I get to get together with all my cousins for a hilarious time! When my cousins Celeste and Estella heard about my blog, they knew that they wanted a post! Both are aspiring hair stylists, and are insanley good at their trade! This video tutorial is a quick, easy, step by step guide to making a cute down do'- something you can wear practically anywhere- be it school, a special date, or a super cool party! So what are you waiting for? Check it out! (If only for the hilarious blooper moments at the end!) :)
Like Love Celeste's and Estella's tutorials? Say so in the comment box below :)
Thanks so much to Celeste and Estella! Needless to say, I can't wait for our next family reunion. And who knows? Maybe after this Celeste and Estella will agree to lend their expertise to even more tutorials!
Please comment if you would like more makeup, hair and tutorials on TeenSew, your one stop shop for everything creative and fashionable!
Happy Hairstyling,
Lilly Ferron
Tuesday, September 27, 2011
Twists and Turns: The Twister Top Pattern by "apfelbluete"
I don't know what it is about this pattern- but sewing it is strangley addicting. First of all, it only takes an hour. Second of all, the end result is awesome looking! The tight arm, and the opposing batwing one looks so cool- it's kind of a optical illusion but made with a needle and thread! Try altering this mini into a top, pair with aviators and jean shorts, and top it all off with a slouchy beret for a look that's totally unique!
Click here for the pattern! As usual, check out these member project to help you decide whether this look is for you!
Happy Sewing!
Lilly :)
Click here for the pattern! As usual, check out these member project to help you decide whether this look is for you!
 |
| By irmchen |
 |
| By Philomenia |
 |
| By apfelbluete |
 |
| vivelyonline |
Lilly :)
Subscribe to:
Posts (Atom)